
So hubby went away for a few days. I still had to shower. Arm was feeling a bit better and slightly steadier in the brace by day 23 so I thought – ok, let’s do this. But… how am I going to do this? Step by step was the answer. It was long-winded but I’ve tried to detail below the steps I took, including some tips. Note – I’m not yet ready to remove my brace/splint and couldn’t do it by myself even if I wanted to… so the aim is to keep the damaged arm, brace and tube bandage dry.
- Make sure there’s plenty of hot water in the tank. Showering one handed could take a while with long hair.
- Make a waterproof arm shield out of a black bin-liner. Cut an armhole in the sealed end small enough to make it tight when pulled up over your shoulder, wide enough to fit over the brace (about 10 cm across, doesn’t matter if it splits a bit further but try to keep it snug).
- Get everything ready. One towel within reach outside the shower, another spread on bed. Comb beside bed (right hand side). Shampoo and conditioner in basket at reachable level in shower. Make sure bottles are unsealed and ready to use. A facecloth in the shower to make it easier to get a grip on the shower tap.
- Prepare proxy sling (I use a long, thin cotton scarf)
- Remove dress/clothing
- Sit on bed and remove collar and cuff, resting lower arm on lap or on a thin pillow on lap
- Gently work black bin-bag up over hand, arm and brace. If you pull it up over your shoulder it should make a reasonable seal at the top to stop water running down. If in doubt, you could have an elastoplast handy or some surgical tape to hold it in place.
- Tie on proxy sling by placing it round neck, and passing it under forearm. Tip head forward to narrow the gap between arm and neck. Use teeth to pull sling tighter so it supports wrist at the right height. Tie in a slip knot if you’re clever or just a granny knot if less so or doing this with your ‘wrong’ hand.
- This should feel comfy and secure enough to stand.
- Climb in shower and turn it on, keeping your damaged arm away from the shower of water.
- Squeeze shampoo onto your head directly or if you can, into the palm of your bad hand (I found this difficult as I still can’t rotate my lower arm very well). Massage in as well as you can. My friend Marjory suggested you could do this before even getting in the shower while looking in a mirror to see what you are doing.
- Rinse and repeat. Wash yourself/condition/rinse etc.
- Turn off shower and step out.
- Pat gently where you can reach, then sit on the towel on the bed to air dry while you remove the proxy sling, then the bin bag. Take your time and relax. Remember to drop your shoulder down to allow gravity to help your bone alignment – don’t hunch your arm up.
- At this point I like to make sure my limp arm is dry and put my collar n cuff sling back on for a bit of security while I take my time combing the knots out of my hair.
- If it’s still too difficult to wash under your broken arm, you can use a baby wipe now to gently clean there. It’s easier if you lean forward slightly to create a gap between your arm and side, then slide your hand in against your side rather than pressing against your arm, even when it’s in the brace, because pushing your arm away from your side hurts! Use a tissue to dry in there and (if applicable) under your boob/moob on the sling side.
- Apply roll-on deodorant – this is quite fun to do (chimpanzee impression) on your good side, and if you are careful you can use it under your bad arm too.
- Get dressed etc
Ta daaaa!

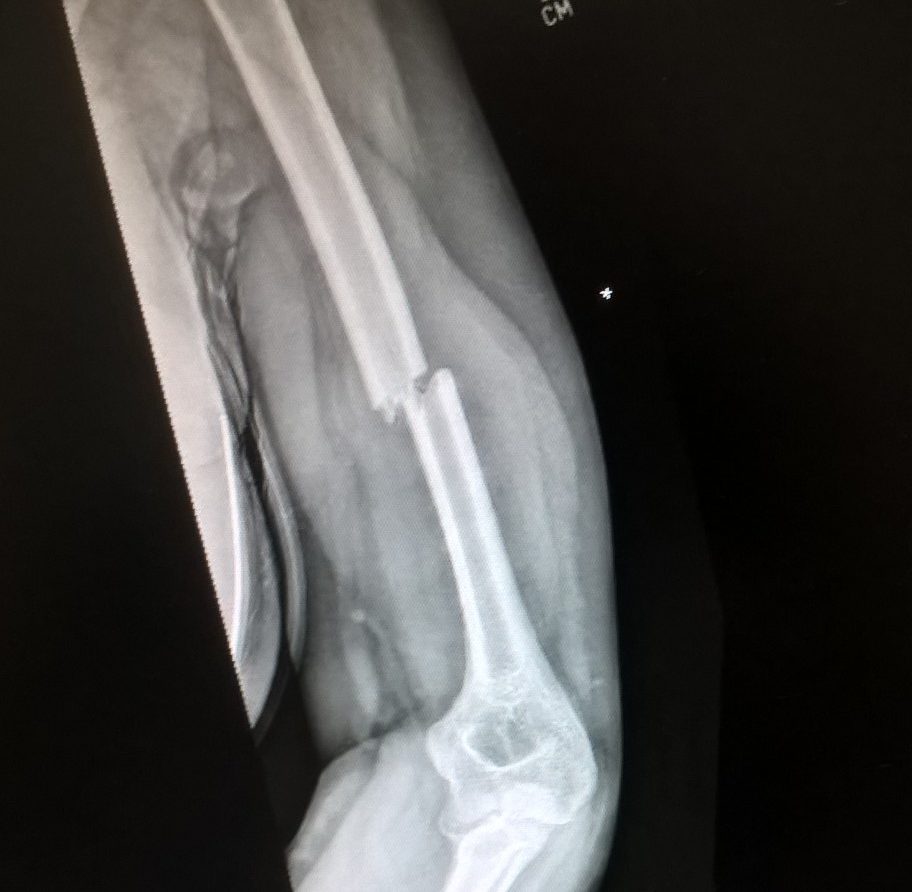
 Getting the brace